Building an Accessible Hugo Blog
Table of Contents
Introduction
Welcome to the first blog post on coleman.engineer! I’m Jacob Coleman, and today, I will explore creating an accessible blog via the Hugo static site generator from start to finish so you can create your own accessible Hugo blog!
Motivation
I’ve wanted to create my own blog for some time, and in 2023, not having a portfolio and a personal brand is a major limiting factor to career growth and personal growth, so I decided now is the best time to create an online presence and play with the latest in blog technology.
Technical Requirements
To do this, I need a platform and workflow that are simple to use but powerful enough to allow complete control from site creation and configuration to deployment and release. The specific technical requirements for my blog are:
- Open Source, ideally written in Golang (because it’s cool!)
- Simple so that the content can shine
- Static site, no dynamic content
- 100% on Google PageSpeed Insights
- Easy to set up, configure, and deploy
- Support for LaTeX and RSS
- Easily update theme(s) as needed
Those requirements meant I needed to find a Golang-based static site generator with a robust theme ecosystem. Though the pool of potential options is tiny, thankfully, one option fulfills all requirements but might be one of the most accessible systems I have ever used. Hugo!
What is Hugo?
Hugo is an open-source static site generator that transforms plain text into static websites and blogs. It’s known for its incredible speed and efficiency, allowing you to create and manage your content easily. With Hugo, you write your content in simple markdown files, which Hugo then converts into a full-fledged website with the help of templates and themes.
I highly encourage exploring the Hugo Themes page. Hugo has a rich theme ecosystem, so you can find something pre-built to customize your needs!
Accessibility
Not only should the blog satisfy all of the above technical requirements, but I want to ensure it is accessible across the broadest range of users and user preferences.
Accessibility Requirements
For accessibility, I am using the WCAG 2.2 Guidelines, and I have the following requirements:
- Auto-theme switch for Light or Dark modes based on user device preferences
- Contrast ratio of at least 7 to 1 to align with the WCAG 2.2 Guidelines
- APCA lightness/darkness contrast value of at least Lc 60 to align with the WCAG 3.0 Guidelines.
- Color scheme that is accessible to those with vision impairments and reduces eye strain
- An easily readable font that allows the reader to focus on the information
Colors
For colors, I wanted values I could invert for either light or dark themes. I began from either end of the RGB spectrum two-pointer style to ensure I was maximizing contrast while reducing eye strain.
For the brightest white color, I settled on #e6e6e6 or rgb(230,230,230). In light mode, this is the background color; in dark mode, this is the text color.
For the darkest black color, I settled on #191919 or rgb(25,25,25). In dark mode, this is the background color; in light mode, this is the text color.
This color combination puts me at an Lc of 89.7, much better than the 60 minimum while still being easy on the eyes, and provides a contrast ratio of 14.08, nearly double the 7 to 1 minimum!
Fonts
For the font, I found the Inter font, sans-serif, to be the most pleasing to the eye. Space Mono is the monospace font used.
Requirements Complete
With the light/dark mode switch in the top right corner, my accessibility requirements are complete!
Development Workflow
My personal development workflow involves a Mac, VS Code, and often using Remote SSH development to a build box designed to handle deployments to a repository. The build box is actively snapshotted into the Cloud and has commercial battery backup. I can now have a failure of my laptop or build-machine and not worry about data loss!
Remote Development with VS Code
You can install and design your Hugo site anywhere. However, I am leveraging VS Code with Remote SSH development in a home lab. Development with VS Code remotely is an optional step. You can skip this section if you are doing this locally!
For the development of this blog, I have a Turing Pi v1 system running a series of 7 RaspberryPi Compute Module 3+ in a tiny blade-like configuration. One of these CM3+ modules is named prototype and is my development environment for this blog. I keep the machine separate and isolated in case anything happens to my laptop so I can easily reach in and make updates and deployments from anywhere using Tailscale, but that is out of the scope of this blog post and a subject I will dive into greater detail further down the road!
The prototype machine runs DietPi, an ARM-based Linux distribution for lean and small systems. However, it is also installable on a standard x86 PC. No additional configuration related to VS Code and remote development from the base DietPi install is necessary as long as you can SSH into your remote machine.
For VS Code to be able to connect over SSH and allow you to perform remote development, you can use the Remote - SSH extension. Once installed, you should now be able to open the command palette and see a Remote SSH: Connect to Host… action; pass in your username@hostname, then VS Code will connect, then prompt you for a password before setting up the environment.
Installing Hugo (Linux arm64)
For all other operating systems and installation instructions, please visit the official Hugo documentation here.
Development Environment
As my development machine prototype is DietPi and on ARM, I want to ensure I have the latest version of Hugo Extended installed. Unfortunately, according to the apt package manager, the latest version of Hugo, as of the time of writing this blog, is a few versions behind the current release. The Debian package is 0.111.3-1 however the latest version of Hugo is actually 0.120.4.
Installing the Latest Hugo Version
I installed the latest version of Hugo by downloading the hugo_extended_0.120.4_linux-arm64.deb file via wget:
wget https://github.com/gohugoio/hugo/releases/download/v0.120.4/hugo_extended_0.120.4_linux-arm64.deb
I then installed it with a single dpkg command:
sudo dpkg -i hugo_extended_0.120.4_linux-arm64.deb
And now my ARM64 DietPi TuringPi development box has the latest version of Hugo!
Creating The Site
At this point, you should have the latest version of Hugo installed and your development environment configured. We can now create our first Hugo site!
Directory Structure
For the sake of organization and since this is a simple personal project, I have created a www folder in the prototype machines home directory. This directory structure will let me house any sites I make with Hugo and keep everything organized.
mkdir ~/www
I then changed into that directory:
cd ~/www
Creation Command
Now, I am ready to use Hugo itself. To create the first site, run the following, changing examplesite.com to your website name:
hugo new site examplesite.com
You will see the following output:
~/www$ hugo new site examplesite.com
Congratulations! Your new Hugo site was created in /home/<username>/www/examplesite.com.

Just a few more steps!

1. Change the current directory to /home/<username>/www/examplesite.com.
...
5. Start the embedded web server with the command "hugo server --buildDrafts".

See documentation at https://gohugo.io/.
Adding a Theme
We’re now ready to add a theme to the site; this is necessary for Hugo to render the website, so picking a theme is vital!
For this website, I have used hugo-blog-awesome as my theme. It is under development, so I copied the contents from the config.toml and placed them in my hugo.toml file.
Using git for Theme Management
I am using git, so to keep the theme updated as necessary, I have it added as a git submodule to the site directory. To do this, I performed the following:
git init
Using git init then lets me add a git submodule for the theme:
git submodule add https://github.com/hugo-sid/hugo-blog-awesome.git themes/hugo-blog-awesome
And anytime I need to update the theme, I can now run:
git submodule update --remote --merge
And now I have the latest revision of the theme!
Configuring the Blog
hugo.toml
Copy the contents of the themes/hugo-blog-awesome/exampleSite/config.toml file into your base site directories hugo.toml file. From your site directory, run the following:
cat ./themes/hugo-blog-awesome/exampleSite/config.toml > hugo.toml
This file will be your source of truth for configuration and the primary method you will use to interact with your site when customizing. Fields and parameters are self-explanatory, so customization should be as simple as possible.
These are the configuration changes I made in my hugo.toml file:
- Removed additional language options
- Set toc = true
- Set tocOpen = true
- Set goToTop = true
- Set math = true
Making File Changes
To make file changes, copy the file from the themes/hugo-blog-awesome/ directory with the same relative path to the root site directory:
site-directory/themes/hugo-blog-awesome/assets/sass/main.scss
To:
site-directory/assets/sass/main.scsss
This way, you keep the theme clean and isolated, and your changes to that theme are local to your repository.
Avatar Image
If you do not have the avatar image when the site renders it will not render the image at all, instead of producing an error or a broken icon. To validate this, you can copy the avatar.jpg from the themes/Hugo-blog-awesome/assets/ directory into your base site directories assets folder, and when you browse to your page, you should now see an image.
Validating Changes
But how do we now browse the page and check? Because we have the hugo.toml filled out with the config.toml contents of the theme exampleSite directory, we can run the hugo server command to render the site for us. But because I am doing remote development, I must tell what IP and URL to use when serving the site so I can navigate to it on my local network. To do this, I start the hugo server from my base site directory as follows:
hugo server --bind 192.168.1.211 --baseURL http://192.168.1.211
Running the hugo server command with the bind and baseURL options lets me navigate to the site on my local network, make changes in VS Code, and see the changes live as they happen!
Deployment
Because I want to get this site up and running as quickly as possible, I will use GitHub Pages and GitHub Actions to handle the deployment and hosting of the site with a custom domain name.
GitHub Pages DNS Records
My domain registrar is Name.com, and I need to add the following DNS servers to my domain name as A records:
185.199.108.153
185.199.109.153
185.199.110.153
185.199.111.153
Propagation can take up to 15 minutes.
GitHub Pages CNAME Record
I also want the www domain to redirect to the standard coleman.engineer domain, so I created a CNAME record along with the above A records that points:
www.coleman.engineer
To my github.io path:
the-chronomancer.github.io
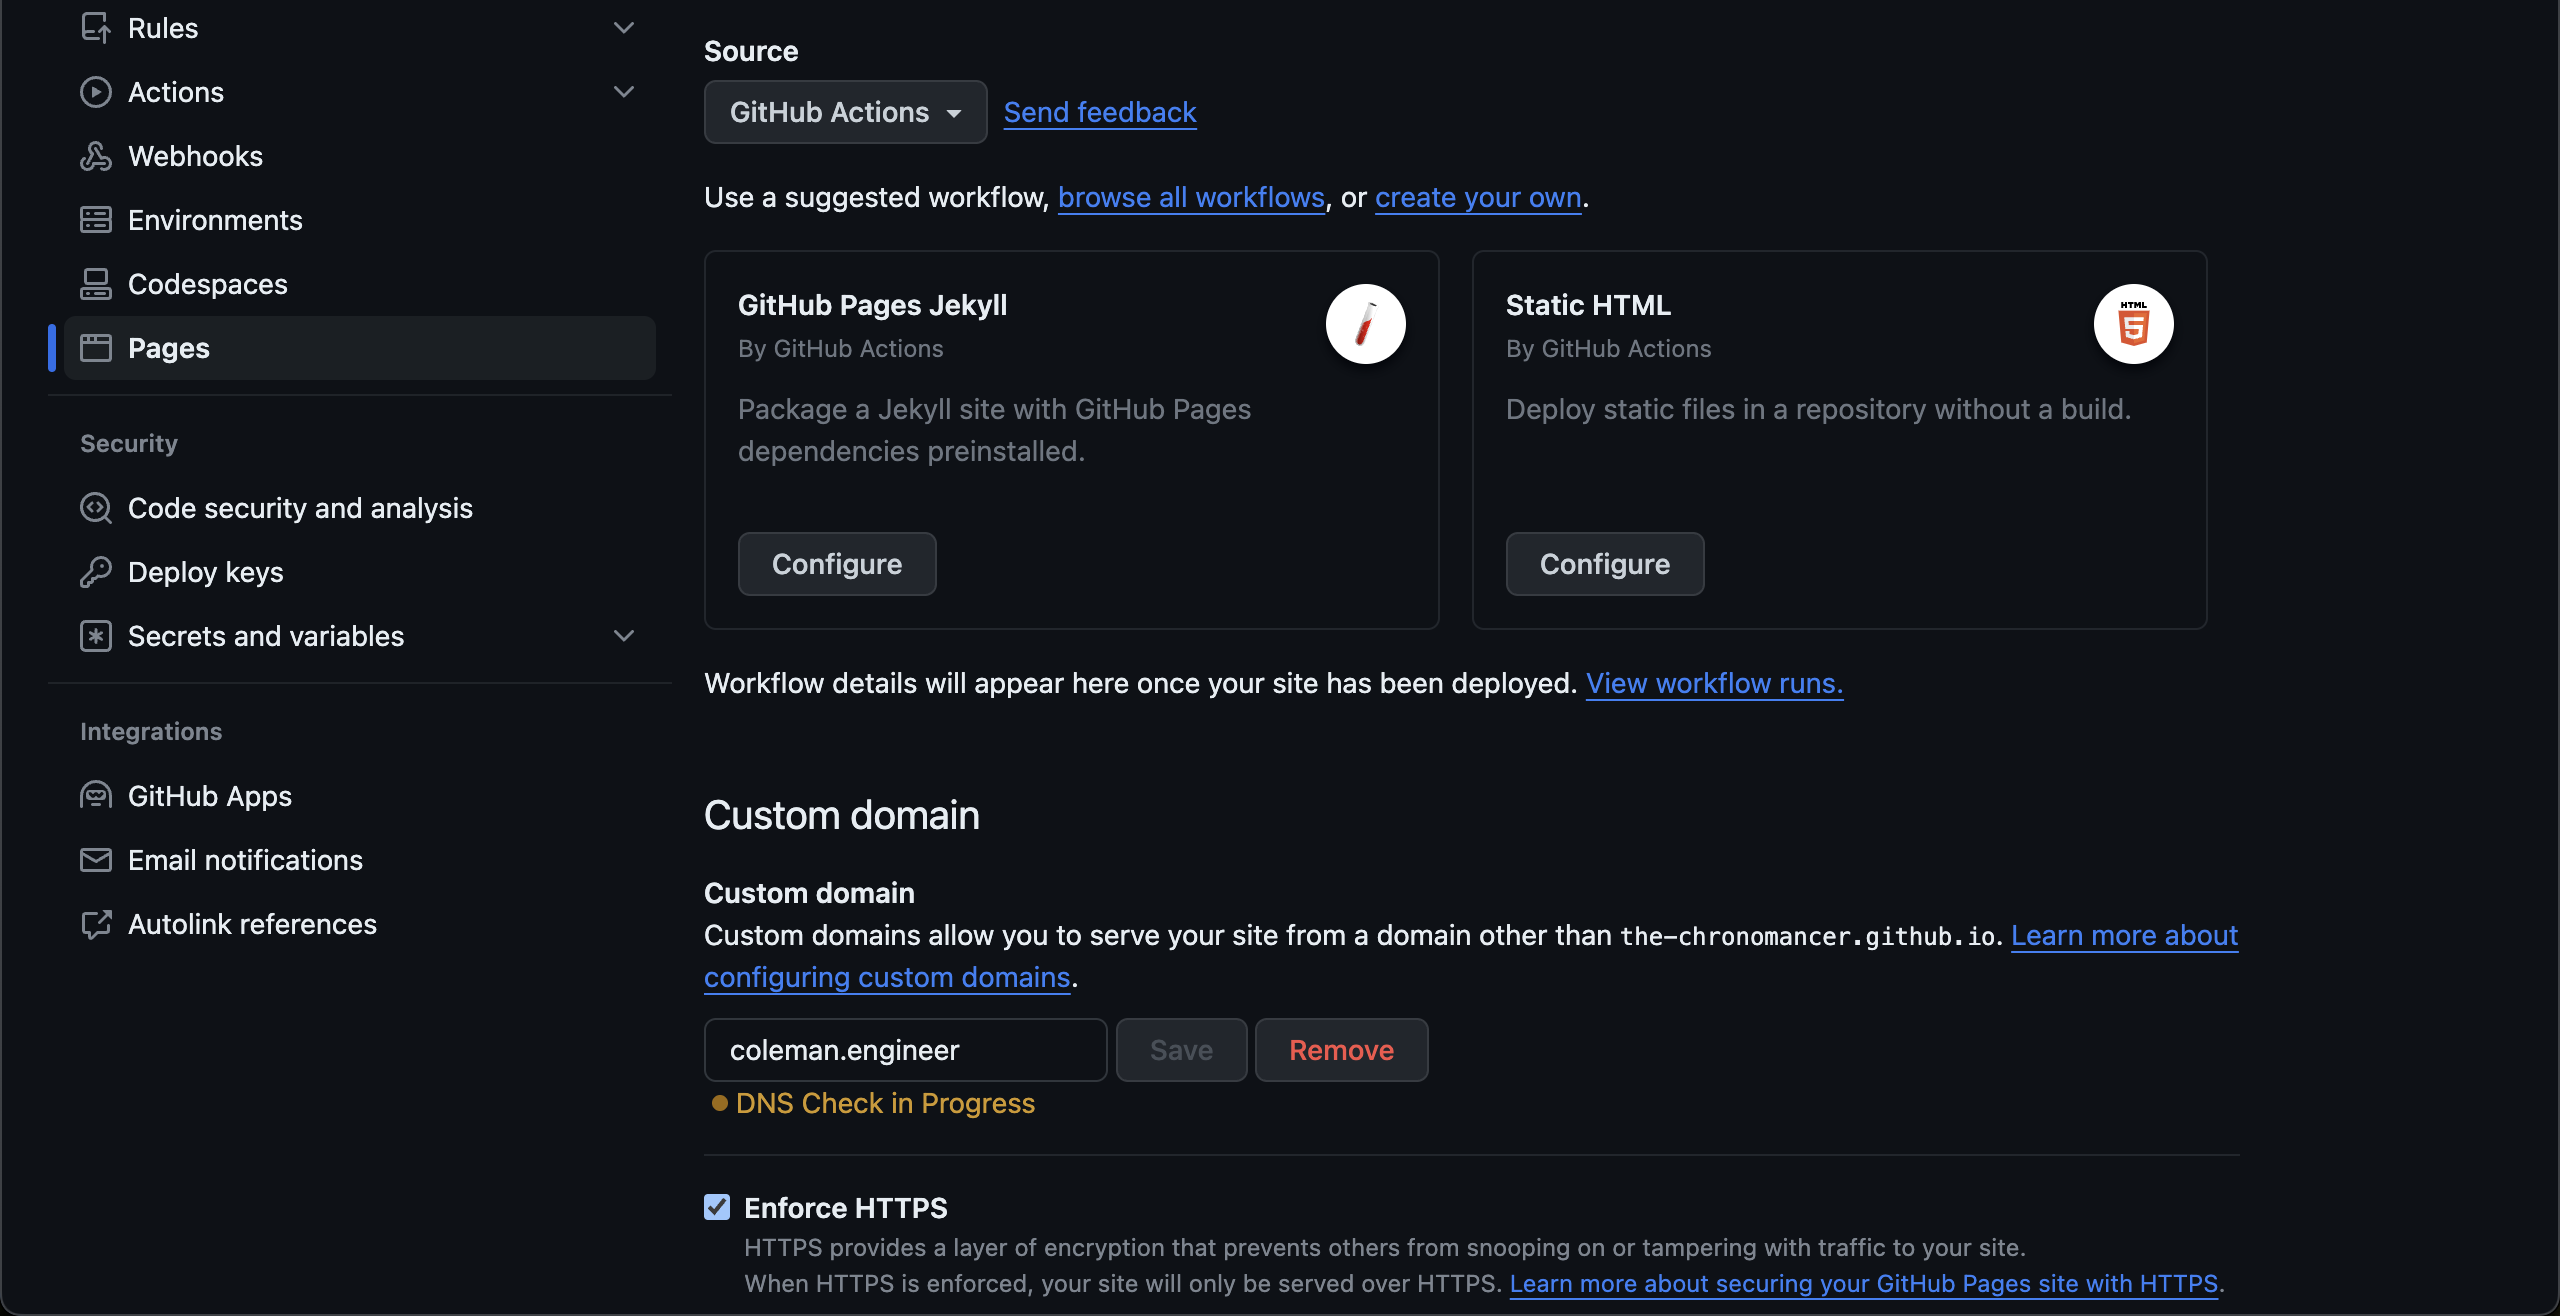
GitHub Repository Settings
I must then navigate to my repository, click on Settings, then Pages, then flip the Source to GitHub Actions. Finally, I must add my domain name to the custom domain field and let the DNS check process. If it fails, even though you added the DNS servers to your domain records, you likely need to wait for the propagation to complete.
GitHub Actions Workflow
I used the provided GitHub Actions Workflow from the Hugo developers, changing the branch name to gh-pages and the Hugo version to 0.120.4 as follows: `
`# Sample workflow for building and deploying a Hugo site to GitHub Pages
name: Deploy Hugo site to Pages

on:
  # Runs on pushes targeting the default branch
  push:
    branches:
      - gh-pages

  # Allows you to run this workflow manually from the Actions tab
  workflow_dispatch:

# Sets permissions of the GITHUB_TOKEN to allow deployment to GitHub Pages
permissions:
  contents: read
  pages: write
  id-token: write

# Allow only one concurrent deployment, skipping runs queued between the run in-progress and latest queued.
# However, do NOT cancel in-progress runs as we want to allow these production deployments to complete.
concurrency:
  group: "pages"
  cancel-in-progress: false

# Default to bash
defaults:
  run:
    shell: bash

jobs:
  # Build job
  build:
    runs-on: ubuntu-latest
    env:
      HUGO_VERSION: 0.120.4
    steps:
      - name: Install Hugo CLI
        run: |
          wget -O ${{ runner.temp }}/hugo.deb https://github.com/gohugoio/hugo/releases/download/v${HUGO_VERSION}/hugo_extended_${HUGO_VERSION}_linux-amd64.deb \
          && sudo dpkg -i ${{ runner.temp }}/hugo.deb
      - name: Install Dart Sass
        run: sudo snap install dart-sass
      - name: Checkout
        uses: actions/checkout@v4
        with:
          submodules: recursive
          fetch-depth: 0
      - name: Setup Pages
        id: pages
        uses: actions/configure-pages@v3
      - name: Install Node.js dependencies
        run: "[[ -f package-lock.json || -f npm-shrinkwrap.json ]] && npm ci || true"
      - name: Build with Hugo
        env:
          # For maximum backward compatibility with Hugo modules
          HUGO_ENVIRONMENT: production
          HUGO_ENV: production
        run: |
          hugo \
            --gc \
            --minify \
            --baseURL "${{ steps.pages.outputs.base_url }}/"
      - name: Upload artifact
        uses: actions/upload-pages-artifact@v2
        with:
          path: ./public

  # Deployment job
  deploy:
    environment:
      name: github-pages
      url: ${{ steps.deployment.outputs.page_url }}
    runs-on: ubuntu-latest
    needs: build
    steps:
      - name: Deploy to GitHub Pages
        id: deployment
        uses: actions/deploy-pages@v2
I can now commit my code to a branch; when ready to deploy, I can create a pull request from that branch and merge that branch into my gh-pages branch to see my website go live! And with that, we’re finished!
Conclusion
Thank you for following along with this blog post; I hope you found it informative and helpful in your journey to create your own accessible blog. Whether you’re a seasoned developer or just starting out, I hope this blog is a valuable resource and inspiration for your projects and enables you throughout your technology journey!
Happy Coding!